Thinkphp 源码阅读
看明白thinkphp5框架是怎么实现的
1 环境
thinkphp5.0.24
"require": {
    "php": ">=5.4.0",
    "topthink/framework": "5.0.*"
},
2 目录结构
thinkphp/                     根目录
    /application              应用目录
        /index                应用index模块目录
    command.php               命令行命令配置目录
    config.php                应用配置文件
    databse.php               应用数据库配置文件
    route.php                 应用路由配置文件

    /public                   入口目录
        /static               静态资源目录
        .htacess              apache服务器配置
        index.php             默认入口文件
        robots.txt            爬虫协议文件
        router.php            php命令行服务器入口文件

    /vendor                   composer安装目录
    build.php                 默认自动生成配置文件
    composer.json             composer安装配置文件
    console                   控制台入口文件

/vendor/topthink/framework    框架核心目录
        /extend               框架扩展目录
        /lang                 框架语言目录
        /library              框架核心目录
        /mode                 框架模式目录
        /tests                框架测试目录
        /tpl                  框架模板目录
        /vendor               第三方目录
        base.php              全局常量文件
        convention.php        全局配置文件
        helper.php            辅助函数文件
        start.php             框架引导入口
        think.php             框架引导文件
3 框架引导start.php
thinkphp为单程序入口,这是mvc框架的特征,程序的入口在public目录下的index.php
// 定义应用目录
define('APP_PATH', __DIR__ . '/../application/');
// 加载框架引导文件
require __DIR__ . '/../thinkphp/start.php';require引入thinkphp的start.php
// ThinkPHP 引导文件
// 1. 加载基础文件
require __DIR__ . '/base.php';

// 2. 执行应用
App::run()->send();在base.php(thinkphp/base.php)中定义了一些常量,比如ROOT_PATH、RUNTIME_PATH、LOG_PATH等等,然后引入Loader类来自动加载
thinkphp/base.php:37
// 载入Loader类
require CORE_PATH . 'Loader.php';然后在下面通过.env文件putenv环境变量,最后
// 注册自动加载
\think\Loader::register();

// 注册错误和异常处理机制
\think\Error::register();

// 加载惯例配置文件
\think\Config::set(include THINK_PATH . 'convention' . EXT);在\think\Loader::register()中,使用think\Loader::autoload注册自动加载
spl_autoload_register($autoload ?: 'think\\Loader::autoload', true, true);当PHP引擎遇到试图实例化未知类的操作时,会调用
__autoload()方法,并将类名当做字符串参数传递给它。spl_autoload_register会将多个autoload函数以数列的形式依次调用注册。
autoload()的定义,通过名字来引入类
public static function autoload($class)
{
    // 检测命名空间别名
    if (!empty(self::$namespaceAlias)) {
        $namespace = dirname($class);
        if (isset(self::$namespaceAlias[$namespace])) {
            $original = self::$namespaceAlias[$namespace] . '\\' . basename($class);
            if (class_exists($original)) {
                return class_alias($original, $class, false);
            }
        }
    }

    if ($file = self::findFile($class)) {
        // 非 Win 环境不严格区分大小写
        if (!IS_WIN || pathinfo($file, PATHINFO_FILENAME) == pathinfo(realpath($file), PATHINFO_FILENAME)) {
            __include_file($file);
            return true;
        }
    }

    return false;
}
注册命名空间定义
self::addNamespace([
    'think'    => LIB_PATH . 'think' . DS,
    'behavior' => LIB_PATH . 'behavior' . DS,
    'traits'   => LIB_PATH . 'traits' . DS,
]);
加载类库映射文件
if (is_file(RUNTIME_PATH . 'classmap' . EXT)) {
    self::addClassMap(__include_file(RUNTIME_PATH . 'classmap' . EXT));
}注册错误和异常处理机制\think\Error::register()
public static function register()
{
    error_reporting(E_ALL);
    set_error_handler([__CLASS__, 'appError']);
    set_exception_handler([__CLASS__, 'appException']);
    register_shutdown_function([__CLASS__, 'appShutdown']);
}将错误、异常、中止时分别交由appError、appException、appShutdown 处理,这三个函数在thinkphp/library/think/Error.php 定义。
接着是加载惯例配置文件
\think\Config::set(include THINK_PATH . 'convention' . EXT);也就是包含thinkphp/convention.php这个配置文件,将配置作为数组变量传入thinkphp/library/think/Config.php:160
thinkphp/start.php:19 启动程序
// 2. 执行应用
App::run()->send();
3.1 小结
thinkphp通过start.php引入的base.php定义文件夹等系统常量,然后引入Loader来加载任意类,通过自动加载使用Error类注册错误处理,以及Config类加载模式配置文件thinkphp/convention.php。做好一系列准备工作之后,执行应用 App::run()->send()
4 应用启动App::run()
在上文加载完配置等一系列工作之后,进入App::run(),在run()方法中
首先拿到Request的一个实例,然后调用$config = self::initCommon()初始化公共配置
public static function initCommon()
{
    if (empty(self::$init)) {
        if (defined('APP_NAMESPACE')) {
            self::$namespace = APP_NAMESPACE;
        }

        Loader::addNamespace(self::$namespace, APP_PATH);

        // 初始化应用
        $config = self::init();
        self::$suffix = $config['class_suffix'];

        // 应用调试模式
        self::$debug = Env::get('app_debug', Config::get('app_debug'));

        if (!self::$debug) {
            ini_set('display_errors', 'Off');
        } elseif (!IS_CLI) {
            // 重新申请一块比较大的 buffer
            if (ob_get_level() > 0) {
                $output = ob_get_clean();
            }

            ob_start();

            if (!empty($output)) {
                echo $output;
            }

        }

        if (!empty($config['root_namespace'])) {
            Loader::addNamespace($config['root_namespace']);
        }

        // 加载额外文件
        if (!empty($config['extra_file_list'])) {
            foreach ($config['extra_file_list'] as $file) {
                $file = strpos($file, '.') ? $file : APP_PATH . $file . EXT;
                if (is_file($file) && !isset(self::$file[$file])) {
                    include $file;
                    self::$file[$file] = true;
                }
            }
        }

        // 设置系统时区
        date_default_timezone_set($config['default_timezone']);

        // 监听 app_init
        Hook::listen('app_init');

        self::$init = true;
    }

    return Config::get();
}先Loader::addNamespace(self::$namespace, APP_PATH)添加app所在的命名空间,然后初始化应用$config = self::init(),然后根据self::$debug决定是否将debug信息写入缓冲区,然后根据$config['extra_file_list']的配置来加载额外的配置文件,然后设置时区,hook回调app_init,最后无参数调用Config::get()返回所有全局配置
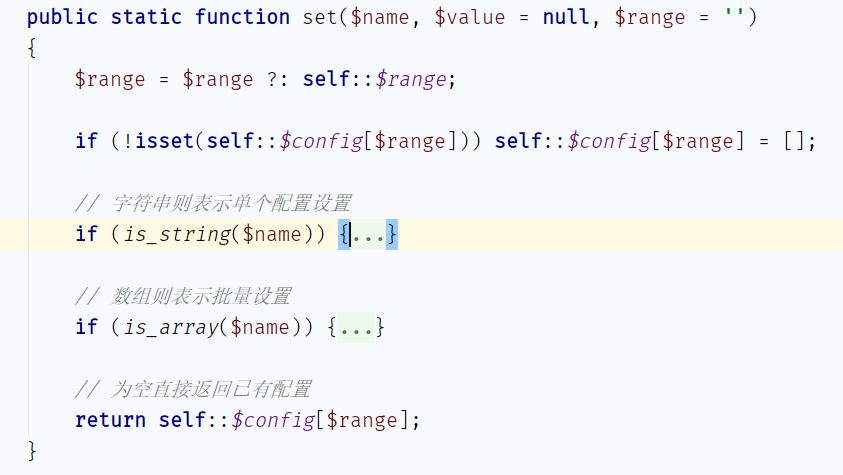
//thinkphp/library/think/Config.php:120
// 无参数时获取所有
if (empty($name) && isset(self::$config[$range])) {
    return self::$config[$range];
}初始化应用self::init()的时候
private static function init($module = '')
{
    // 定位模块目录
    $module = $module ? $module . DS : '';

    // 加载初始化文件
    if (is_file(APP_PATH . $module . 'init' . EXT)) {
        include APP_PATH . $module . 'init' . EXT;
    } elseif (is_file(RUNTIME_PATH . $module . 'init' . EXT)) {
        include RUNTIME_PATH . $module . 'init' . EXT;
    } else {
        // 加载模块配置
        $config = Config::load(CONF_PATH . $module . 'config' . CONF_EXT);

        // 读取数据库配置文件
        $filename = CONF_PATH . $module . 'database' . CONF_EXT;
        Config::load($filename, 'database');

        // 读取扩展配置文件
        if (is_dir(CONF_PATH . $module . 'extra')) {
            $dir = CONF_PATH . $module . 'extra';
            $files = scandir($dir);
            foreach ($files as $file) {
                if ('.' . pathinfo($file, PATHINFO_EXTENSION) === CONF_EXT) {
                    $filename = $dir . DS . $file;
                    Config::load($filename, pathinfo($file, PATHINFO_FILENAME));
                }
            }
        }

        // 加载应用状态配置
        if ($config['app_status']) {
            Config::load(CONF_PATH . $module . $config['app_status'] . CONF_EXT);
        }

        // 加载行为扩展文件
        if (is_file(CONF_PATH . $module . 'tags' . EXT)) {
            Hook::import(include CONF_PATH . $module . 'tags' . EXT);
        }

        // 加载公共文件
        $path = APP_PATH . $module;
        if (is_file($path . 'common' . EXT)) {
            include $path . 'common' . EXT;
        }

        // 加载当前模块语言包
        if ($module) {
            Lang::load($path . 'lang' . DS . Request::instance()->langset() . EXT);
        }
    }

    return Config::get();
}根据传入的$module判断是模块还是整个应用需要初始化,如果是模块就包含APP_PATH . $module . 'init' . EXT,也就是/application/init.php,如果没传module就包含application/config.php,然后就是加载一些配置文件和语言包。
其实self::initCommon()就是为了拿到全局的配置参数,继续看run方法。
在拿到全局配置$config = self::initCommon();之后,然后根据auto_bind_module和BIND_MODULE两个常量来决定是否需要自动绑定模块,绑定完之后进行了
$request->filter($config['default_filter'])设置当前的过滤规则,然后加载语言,监听app_dispatch应用调度,获取应用调度信息,如果应用调度信息$dispatch为空,则进行路由check $dispatch = self::routeCheck($request, $config),路由check太多了,我拿出来写,然后记录当前调度信息$request->dispatch($dispatch),根据debug写日志,最后检查缓存之后执行了exec函数拿到$data作为response的值,返回response,而exec()才是真正的应用调度函数,会根据$dispatch的值来进入不同的调度模式,也单独拿出来说,至此App.php中就走完了,然后经过thinkphp/start.php的send()发送到客户端。
4.1 小结
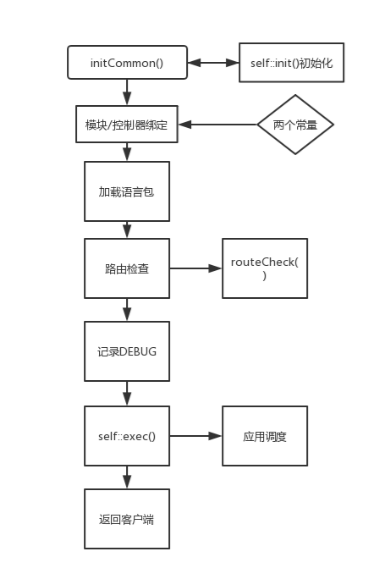
App::run()是thinkphp程序的主要核心,在其中进行了初始化应用配置–>模块/控制器绑定–>加载语言包–>路由检查–>DEBUG记录–>exec()应用调度–>输出客户端,简单画了一个流程图
5 路由检查self::routeCheck()
上文中我们说过,在未设置调度信息会进行URL路由检测
if (empty($dispatch)) {
    $dispatch = self::routeCheck($request, $config);
}
跟进看下定义
public static function routeCheck($request, array $config)
{
    $path = $request->path();
    $depr = $config['pathinfo_depr'];
    $result = false;

    // 路由检测
    $check = !is_null(self::$routeCheck) ? self::$routeCheck : $config['url_route_on'];
    if ($check) {
        // 开启路由
        if (is_file(RUNTIME_PATH . 'route.php')) {
            // 读取路由缓存
            $rules = include RUNTIME_PATH . 'route.php';
            is_array($rules) && Route::rules($rules);
        } else {
            $files = $config['route_config_file'];
            foreach ($files as $file) {
                if (is_file(CONF_PATH . $file . CONF_EXT)) {
                    // 导入路由配置
                    $rules = include CONF_PATH . $file . CONF_EXT;
                    is_array($rules) && Route::import($rules);
                }
            }
        }

        // 路由检测(根据路由定义返回不同的URL调度)
        $result = Route::check($request, $path, $depr, $config['url_domain_deploy']);
        $must = !is_null(self::$routeMust) ? self::$routeMust : $config['url_route_must'];

        if ($must && false === $result) {
            // 路由无效
            throw new RouteNotFoundException();
        }
    }

    // 路由无效 解析模块/控制器/操作/参数... 支持控制器自动搜索
    if (false === $result) {
        $result = Route::parseUrl($path, $depr, $config['controller_auto_search']);
    }

    return $result;
}首先$path是request实例拿到的uri路径,注意是从public目录开始的uri路径,$depr是config.php中定义的pathinfo分隔符,然后进入if语句块,如果有路由缓存会读路由缓存,没有的话会读/application/route.php导入路由,经过Route::check()后,会拿$config['url_route_must']来判断是否是强路由
// 是否强制使用路由
'url_route_must' => false,如果是强路由会抛出throw new RouteNotFoundException() 异常,如果没有开启强路由会进入Route::parseUrl($path, $depr, $config['controller_auto_search'])自动解析模块/控制器/操作/参数
先跟进到Route::check()康康
public static function check($request, $url, $depr = '/', $checkDomain = false)
{
    //检查解析缓存
    if (!App::$debug && Config::get('route_check_cache')) {
        $key = self::getCheckCacheKey($request);
        if (Cache::has($key)) {
            list($rule, $route, $pathinfo, $option, $matches) = Cache::get($key);
            return self::parseRule($rule, $route, $pathinfo, $option, $matches, true);
        }
    }

    // 分隔符替换 确保路由定义使用统一的分隔符
    $url = str_replace($depr, '|', $url);

    if (isset(self::$rules['alias'][$url]) || isset(self::$rules['alias'][strstr($url, '|', true)])) {
        // 检测路由别名
        $result = self::checkRouteAlias($request, $url, $depr);
        if (false !== $result) {
            return $result;
        }
    }
    $method = strtolower($request->method());
    // 获取当前请求类型的路由规则
    $rules = isset(self::$rules[$method]) ? self::$rules[$method] : [];
    // 检测域名部署
    if ($checkDomain) {
        self::checkDomain($request, $rules, $method);
    }
    // 检测URL绑定
    $return = self::checkUrlBind($url, $rules, $depr);
    if (false !== $return) {
        return $return;
    }
    if ('|' != $url) {
        $url = rtrim($url, '|');
    }
    $item = str_replace('|', '/', $url);
    if (isset($rules[$item])) {
        // 静态路由规则检测
        $rule = $rules[$item];
        if (true === $rule) {
            $rule = self::getRouteExpress($item);
        }
        if (!empty($rule['route']) && self::checkOption($rule['option'], $request)) {
            self::setOption($rule['option']);
            return self::parseRule($item, $rule['route'], $url, $rule['option']);
        }
    }

    // 路由规则检测
    if (!empty($rules)) {
        return self::checkRoute($request, $rules, $url, $depr);
    }
    return false;
}
首先检查路由缓存,默认config.php中是不开启路由缓存的,然后检测路由别名
private static $rules = [
    'get'     => [],
    'post'    => [],
    'put'     => [],
    'delete'  => [],
    'patch'   => [],
    'head'    => [],
    'options' => [],
    '*'       => [],
    'alias'   => [],
    'domain'  => [],
    'pattern' => [],
    'name'    => [],
];如果路由存在别名会进入checkRouteAlias(),在这个函数内会直接进入到路由对应的模块/控制器/操作。如果不存在别名会继续检查,然后是获取当前请求类型的路由规则->检测域名部署checkDomain()->检测URL绑定checkUrlBind(),然后会判断是否是静态路由,如果是会返回parseRule(),不然返回self::checkRoute($request, $rules, $url, $depr)。
在这里我要提一手thinkphp的多种路由定义
| 定义方式 | 定义格式 |
|---|---|
| 方式1:路由到模块/控制器 | ‘[模块/控制器/操作]?额外参数1=值1&额外参数2=值2…’ |
| 方式2:路由到重定向地址 | ‘外部地址’(默认301重定向) 或者 [‘外部地址’,‘重定向代码’] |
| 方式3:路由到控制器的方法 | ‘@[模块/控制器/]操作’ |
| 方式4:路由到类的方法 | ‘\完整的命名空间类::静态方法’ 或者 ‘\完整的命名空间类@动态方法’ |
| 方式5:路由到闭包函数 | 闭包函数定义(支持参数传入) |
因为多种路由模式的支持,所以程序的流程也不尽相同,我这里只分析第一种模块/控制器/操作的形式。再看App::routeCheck(),如果不是route.php定义的路由并且没有开启强路由会开始自动搜索控制器
// 路由无效 解析模块/控制器/操作/参数... 支持控制器自动搜索
if (false === $result) {
    $result = Route::parseUrl($path, $depr, $config['controller_auto_search']);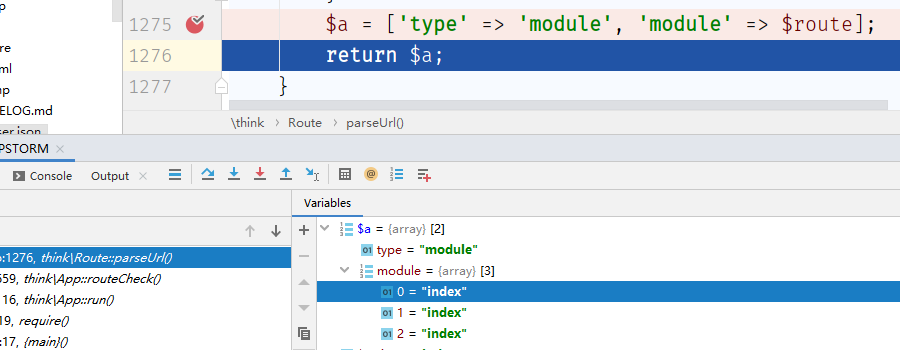
}最终程序会进入parseUrl()来解析url,在parseUrl()中会解析url参数parseUrlParams(),这两个函数就不分析了,就是单纯的分割参数存储数组,最后会return一个['type' => 'module', 'module' => $route]
说的不是很明白,我这边直接访问
http://php.local/public/index.php?s=index/index/index/id/1那么可以看到parseUrl()返回的就是一个数组,数组中存放着模块控制器/操作
routeCheck()返回的$result会作为thinkphp/library/think/App.php:116的$dispatch的值,进入到exec()的应用调度中。
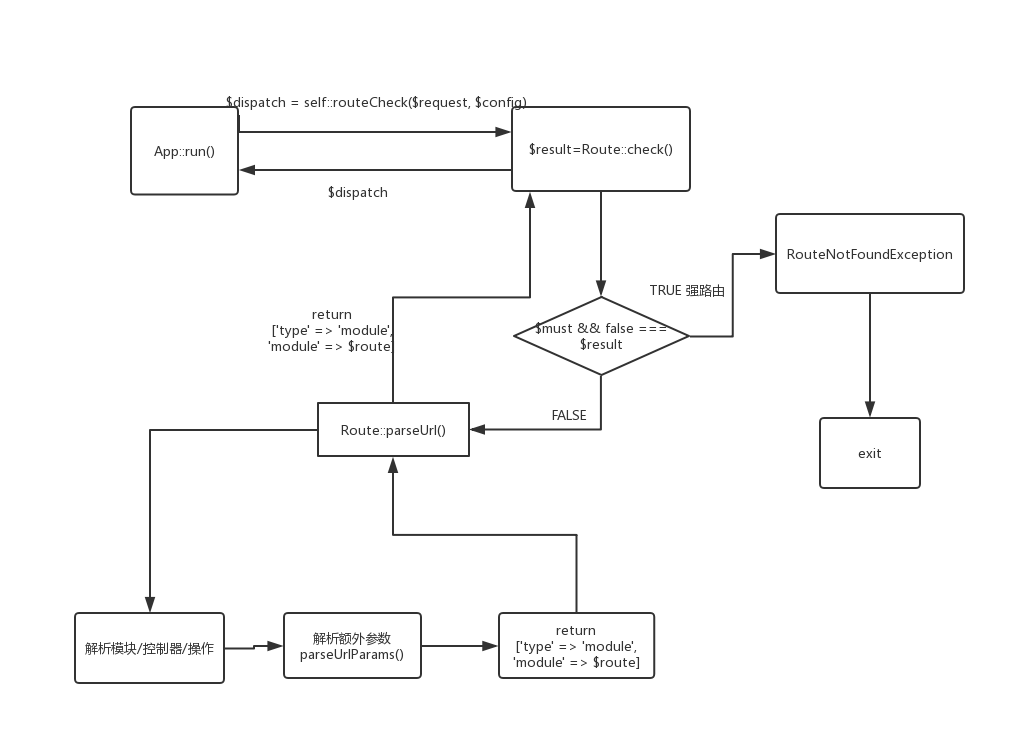
5.1 小结
又臭又长的文字不如一张图
6 应用调度App::exec()
我们上文提到了routeCheck()返回的$dispatch会进入到exec()函数中
protected static function exec($dispatch, $config)
{
    switch ($dispatch['type']) {
        case 'redirect': // 重定向跳转
            $data = Response::create($dispatch['url'], 'redirect')
                ->code($dispatch['status']);
            break;
        case 'module': // 模块/控制器/操作
            $data = self::module(
                $dispatch['module'],
                $config,
                isset($dispatch['convert']) ? $dispatch['convert'] : null
            );
            break;
        case 'controller': // 执行控制器操作
            $vars = array_merge(Request::instance()->param(), $dispatch['var']);
            $data = Loader::action(
                $dispatch['controller'],
                $vars,
                $config['url_controller_layer'],
                $config['controller_suffix']
            );
            break;
        case 'method': // 回调方法
            $vars = array_merge(Request::instance()->param(), $dispatch['var']);
            $data = self::invokeMethod($dispatch['method'], $vars);
            break;
        case 'function': // 闭包
            $data = self::invokeFunction($dispatch['function']);
            break;
        case 'response': // Response 实例
            $data = $dispatch['response'];
            break;
        default:
            throw new \InvalidArgumentException('dispatch type not support');
    }

    return $data;
}在这个方法中会根据不同的$dispatch['type']调度类型来进行区别处理,其中除了redirect和response之外的case语句块都会调用App内的静态方法通过反射实现调用模块/控制器/操作
module调度类型的self::module() -> self::invokeMethod()
controller调度类型的Loader::action() -> 进入App::invokeMethod()
method调度类型的self::invokeMethod()
function调度类型的self::invokeFunction()看定义invokeMethod()
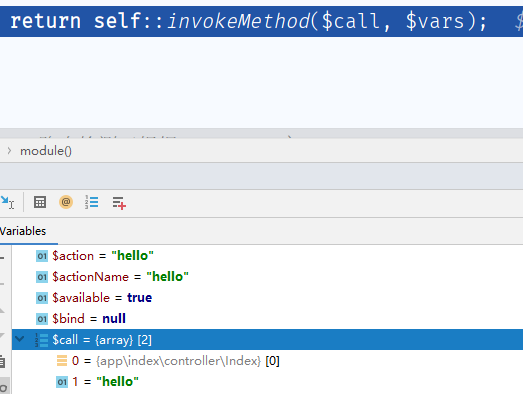
public static function invokeMethod($method, $vars = [])
{
    if (is_array($method)) {
        $class = is_object($method[0]) ? $method[0] : self::invokeClass($method[0]);
        $reflect = new \ReflectionMethod($class, $method[1]);
    } else {
        // 静态方法
        $reflect = new \ReflectionMethod($method);
    }

    $args = self::bindParams($reflect, $vars);

    self::$debug && Log::record('[ RUN ] ' . $reflect->class . '->' . $reflect->name . '[ ' . $reflect->getFileName() . ' ]', 'info');

    return $reflect->invokeArgs(isset($class) ? $class : null, $args);
}在invokeMethod()中,创建反射方法$reflect = new \ReflectionMethod($class, $method[1]);,获取反射函数$args = self::bindParams($reflect, $vars);,接着记录日志后调用$reflect->invokeArgs(isset($class) ? $class : null, $args);反射调用模块/控制器/操作中的操作。
为了方便解释我在index控制器创建了hello方法
public function hello($name)
{
    return 'hello' . $name;
}
然后访问
http://php.local/public/index.php?s=index/index/hello/name/aaa此时模块调度进入module的case语句
case 'module': // 模块/控制器/操作
    $data = self::module(
        $dispatch['module'],
        $config,
        isset($dispatch['convert']) ? $dispatch['convert'] : null
    );
break;在module方法中
hello方法,但是此时的参数是空的,而我们传入有name=aaa参数,那么这个参数在哪赋值的呢?跟进反射看看
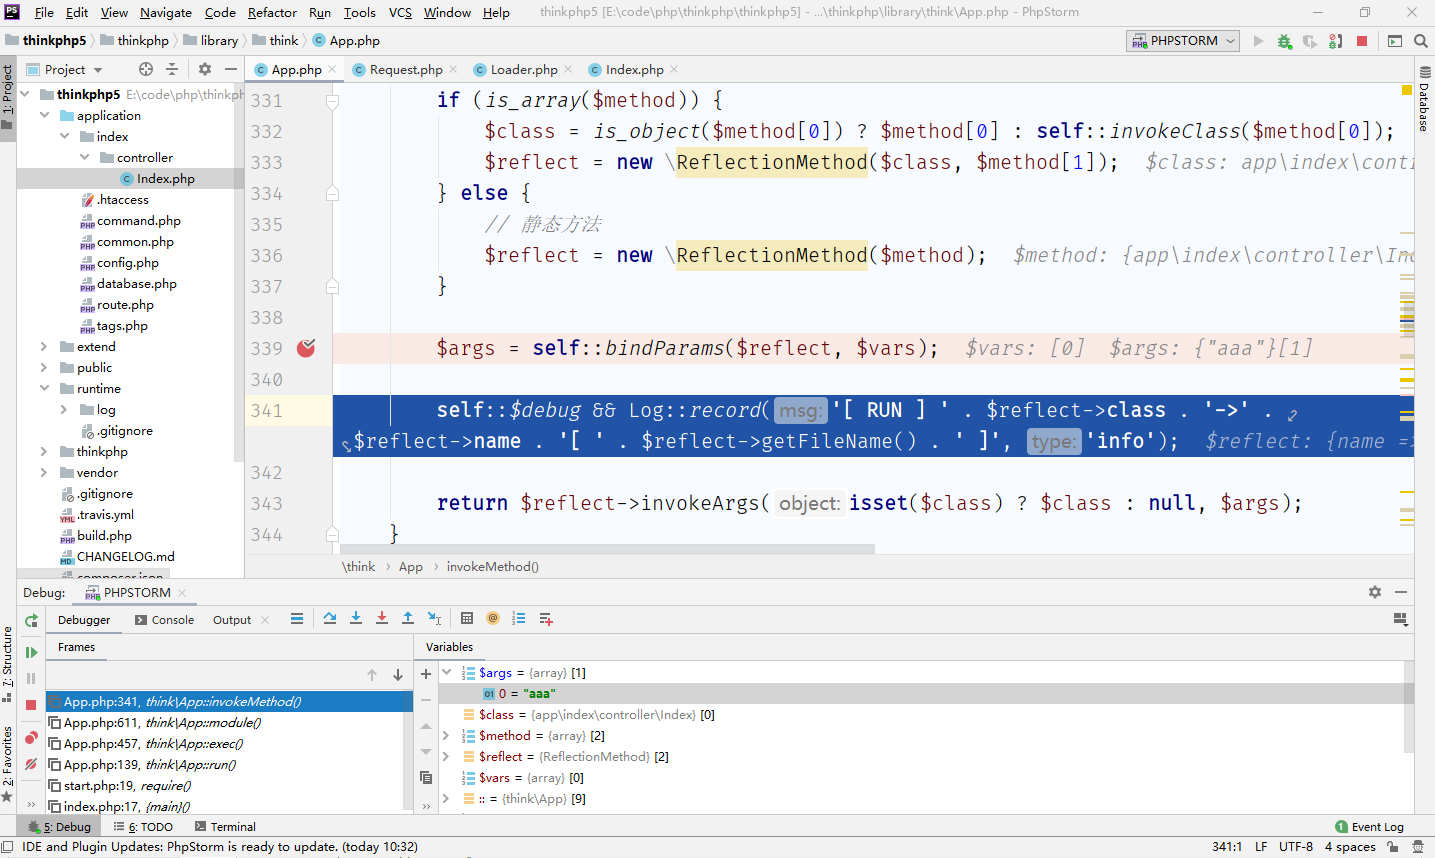
$args = self::bindParams($reflect, $vars)作为invokeArgs()的反射参数
private static function bindParams($reflect, $vars = [])
{
    // 自动获取请求变量
    if (empty($vars)) {
        $vars = Config::get('url_param_type') ?
            Request::instance()->route() :
        Request::instance()->param();
    }

    $args = [];
    if ($reflect->getNumberOfParameters() > 0) {
        // 判断数组类型 数字数组时按顺序绑定参数
        reset($vars);
        $type = key($vars) === 0 ? 1 : 0;

        foreach ($reflect->getParameters() as $param) {
            $args[] = self::getParamValue($param, $vars, $type);
        }
    }

    return $args;
}args会从Request::instance()->route()或者Request::instance()->param();获取,也就是request中获取。这样就实现了从url中达到动态调用模块/控制器/操作的目的。
6.1 小结
应用调度就是这样完成他的使命,一个switch语句判断$dispatch['type'],然后进入不同的处理,如果实现业务逻辑则会通过反射类调用相应的模块/控制器/操作函数,拿到操作返回的数据之后整个exec()函数就结束了。最终继续执行App::run()方法返回response对象,进入send()方法返回给客户端,整个流程结束。
7 请求处理Request类
请求类处于thinkphp/library/think/Request.php,众所周知的是thinkphp有助手函数input()来获取请求参数,本节说一下thinkphp中具体怎么实现的。
我们先来给一个控制器来做演示
public function hello($name)
{
    if(input('?name')){
        var_dump(input('?name'));
        return input('name');
    }else{
        return '没有设置name参数!';
    }
}
助手函数input()可以这么写:
input('param.name');
input('param.');
或者
input('name');
input('');
判断有没有传递某个参数可以用
input('?get.id');
input('?post.name');我们打断点跟进下,进入到thinkphp/helper.php:121
function input($key = '', $default = null, $filter = '')
{
    if (0 === strpos($key, '?')) {
        $key = substr($key, 1);
        $has = true;
    }
    if ($pos = strpos($key, '.')) {
        // 指定参数来源
        list($method, $key) = explode('.', $key, 2);
        if (!in_array($method, ['get', 'post', 'put', 'patch', 'delete', 'route', 'param', 'request', 'session', 'cookie', 'server', 'env', 'path', 'file'])) {
            $key    = $method . '.' . $key;
            $method = 'param';
        }
    } else {
        // 默认为自动判断
        $method = 'param';
    }
    if (isset($has)) {
        return request()->has($key, $method, $default);
    } else {
        return request()->$method($key, $default, $filter);
    }
}
第一个if是为了来判断是否传递某个参数
input('?get.id');
input('?post.name');这种写法,会进入request()->has($key, $method, $default),request()方法会返回一个request类的实例
function request()
{
    return Request::instance();
}has()方法会返回一个布尔值来决定是否传递了这个参数
public function has($name, $type = 'param', $checkEmpty = false)
{
    if (empty($this->$type)) {
        $param = $this->$type();
    } else {
        $param = $this->$type;
    }
    // 按.拆分成多维数组进行判断
    foreach (explode('.', $name) as $val) {
        if (isset($param[$val])) {
            $param = $param[$val];
        } else {
            return false;
        }
    }
    return ($checkEmpty && '' === $param) ? false : true;
}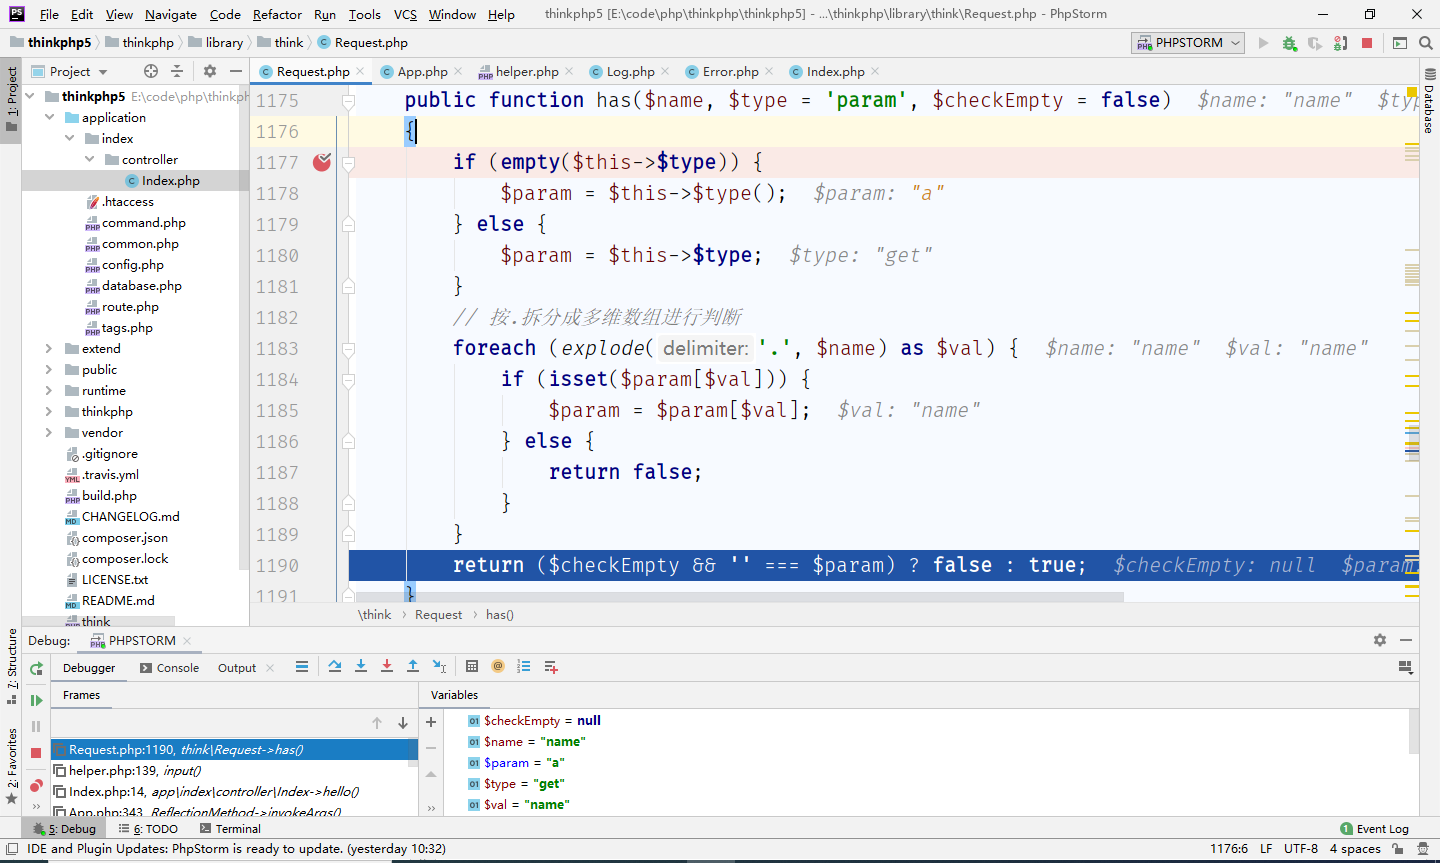
http://php.local/public/index.php?s=index/index/hello/name/aaa页面则会返回

input('?name')这种语法,我们继续跟进input('name')这种语法,他会进入
return request()->$method($key, $default, $filter);当没有包含?或.时,
input('?name')
input('?get.name')会进入request()->$method($key, $default, $filter),此时会进入的就是request类中的param()方法,跟进
public function param($name = '', $default = null, $filter = '')
{
    if (empty($this->mergeParam)) {
        $method = $this->method(true);
        // 自动获取请求变量
        switch ($method) {
            case 'POST':
                $vars = $this->post(false);
                break;
            case 'PUT':
            case 'DELETE':
            case 'PATCH':
                $vars = $this->put(false);
                break;
            default:
                $vars = [];
        }
        // 当前请求参数和URL地址中的参数合并
        $this->param = array_merge($this->param, $this->get(false), $vars, $this->route(false));
        $this->mergeParam = true;
    }
    if (true === $name) {
        // 获取包含文件上传信息的数组
        $file = $this->file();
        $data = is_array($file) ? array_merge($this->param, $file) : $this->param;
        return $this->input($data, '', $default, $filter);
    }
    return $this->input($this->param, $name, $default, $filter);
}param()方法会将原生$_GET、$_POST等全局数组的参数合并到$this->param,然后进入$this->input()
public function input($data = [], $name = '', $default = null, $filter = '')
{
    if (false === $name) {
        // 获取原始数据
        return $data;
    }
    $name = (string)$name;
    if ('' != $name) {
        // 解析name
        if (strpos($name, '/')) {
            list($name, $type) = explode('/', $name);
        } else {
            $type = 's';
        }
        // 按.拆分成多维数组进行判断
        foreach (explode('.', $name) as $val) {
            if (isset($data[$val])) {
                $data = $data[$val];
            } else {
                // 无输入数据,返回默认值
                return $default;
            }
        }
        if (is_object($data)) {
            return $data;
        }
    }

    // 解析过滤器
    $filter = $this->getFilter($filter, $default);

    if (is_array($data)) {
        array_walk_recursive($data, [$this, 'filterValue'], $filter);
        reset($data);
    } else {
        $this->filterValue($data, $name, $filter);
    }

    if (isset($type) && $data !== $default) {
        // 强制类型转换
        $this->typeCast($data, $type);
    }
    return $data;
}可以看出来input()是用来接收参数,并且经过了一层filterValue()过滤和$this->typeCast($data, $type)强制类型转换
private function filterValue(&$value, $key, $filters)
{
    $default = array_pop($filters);
    foreach ($filters as $filter) {
        if (is_callable($filter)) {
            // 调用函数或者方法过滤
            $value = call_user_func($filter, $value);
        } elseif (is_scalar($value)) {
            if (false !== strpos($filter, '/')) {
                // 正则过滤
                if (!preg_match($filter, $value)) {
                    // 匹配不成功返回默认值
                    $value = $default;
                    break;
                }
            } elseif (!empty($filter)) {
                // filter函数不存在时, 则使用filter_var进行过滤
                // filter为非整形值时, 调用filter_id取得过滤id
                $value = filter_var($value, is_int($filter) ? $filter : filter_id($filter));
                if (false === $value) {
                    $value = $default;
                    break;
                }
            }
        }
    }
    return $this->filterExp($value);
}filterValue()会使用$fileter通过call_user_func来回调过滤,thinkphp5.x的rce就是覆盖此处的$filter为system()来执行命令,最后会$filterExp过滤关键字符
public function filterExp(&$value)
{
    // 过滤查询特殊字符
    if (is_string($value) && preg_match('/^(EXP|NEQ|GT|EGT|LT|ELT|OR|XOR|LIKE|NOTLIKE|NOT LIKE|NOT BETWEEN|NOTBETWEEN|BETWEEN|NOT EXISTS|NOTEXISTS|EXISTS|NOT NULL|NOTNULL|NULL|BETWEEN TIME|NOT BETWEEN TIME|NOTBETWEEN TIME|NOTIN|NOT IN|IN)$/i', $value)) {
        $value .= ' ';
    }
    // TODO 其他安全过滤
}thinkphp3.2.3的exp和bind注入就出自此处。再来看上文的强制类型转换$this->typeCast($data, $type)
private function typeCast(&$data, $type)
{
    switch (strtolower($type)) {
            // 数组
        case 'a':
            $data = (array)$data;
            break;
            // 数字
        case 'd':
            $data = (int)$data;
            break;
            // 浮点
        case 'f':
            $data = (float)$data;
            break;
            // 布尔
        case 'b':
            $data = (boolean)$data;
            break;
            // 字符串
        case 's':
        default:
            if (is_scalar($data)) {
                $data = (string)$data;
            } else {
                throw new \InvalidArgumentException('variable type error:' . gettype($data));
            }
    }
}
此时可知 input()助手函数 ->request类param() -> request类input()获取参数
我们此时再来看下request类,这个类中有很多函数,比如get()、post()、put()、env()、delete()等,其实他们最终都会流向input()函数
public function get($name = '', $default = null, $filter = '')
{
    if (empty($this->get)) {
        $this->get = $_GET;
    }
    if (is_array($name)) {
        $this->param = [];
        $this->mergeParam = false;
        return $this->get = array_merge($this->get, $name);
    }
    return $this->input($this->get, $name, $default, $filter);
}比如get()会合并$_GET数组中的参数然后传入input()。
7.1 小结
Request类是一个获取请求类,thinkphp将多种请求的全局数组封装了一下,变为自己的函数,并且进行了过滤和强制类型转换,以此保证参数的安全性。
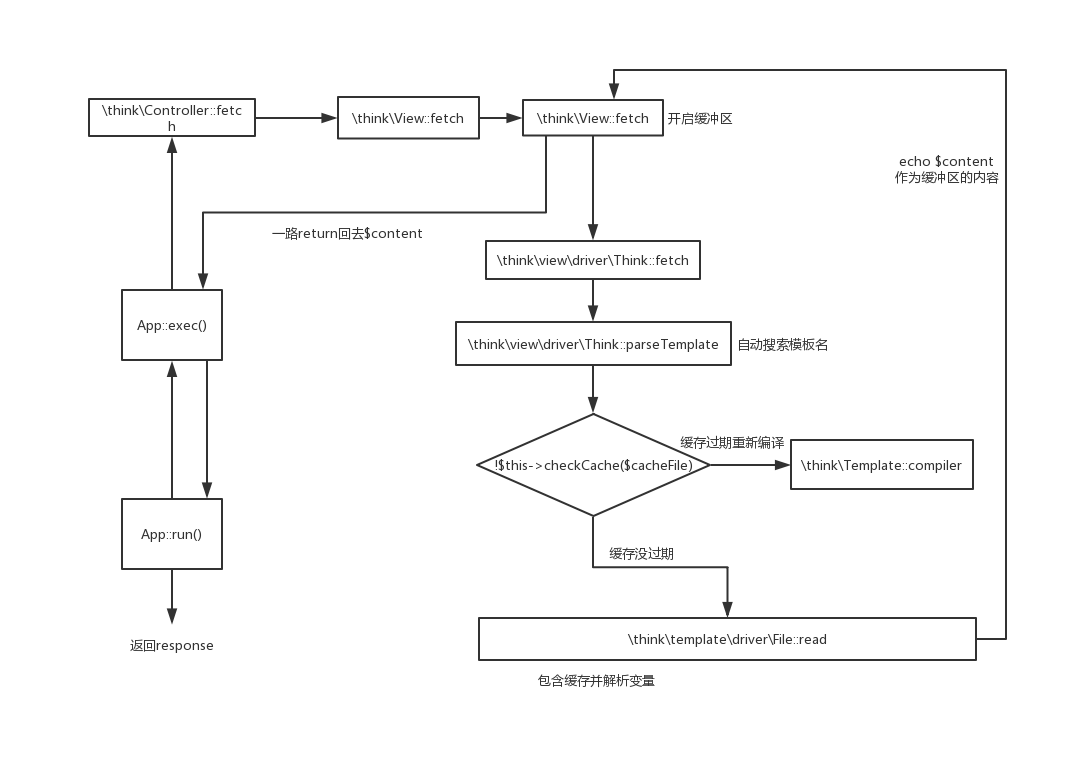
8 视图渲染View.php
<?php

namespace app\index\controller;

use think\Controller;

class Index extends Controller
{
    public function index($name)
    {
        $this->assign('name',$name);
        return $this->fetch();
    }
}写一个index方法来赋值变量并渲染模板,需要注意继承父类Controller,不然没法使用assign和fetch。创建模板文件application/index/view/index/index.html,内容为
hello {$name}然后我们来康康thinkphp是怎么实现的模板功能,打断点
//thinkphp/library/think/Controller.php
protected function assign($name, $value = '')
{
    $this->view->assign($name, $value);

    return $this;
}跟进$this->view->assign()
public function assign($name, $value = '')
{
    if (is_array($name)) {
        $this->data = array_merge($this->data, $name);
    } else {
        $this->data[$name] = $value;
    }
    return $this;
}这个方法中把赋给模板的参数合并到$this->data,然后返回进入$this->fetch(),
//thinkphp/library/think/Controller.php:118
protected function fetch($template = '', $vars = [], $replace = [], $config = [])
{
    return $this->view->fetch($template, $vars, $replace, $config);
}
继续跟进
public function fetch($template = '', $vars = [], $replace = [], $config = [], $renderContent = false)
{
    // 模板变量
    $vars = array_merge(self::$var, $this->data, $vars);

    // 页面缓存
    ob_start();
    ob_implicit_flush(0);

    // 渲染输出
    try {
        $method = $renderContent ? 'display' : 'fetch';
        // 允许用户自定义模板的字符串替换
        $replace = array_merge($this->replace, $replace, (array) $this->engine->config('tpl_replace_string'));
        $this->engine->config('tpl_replace_string', $replace);
        $this->engine->$method($template, $vars, $config);
    } catch (\Exception $e) {
        ob_end_clean();
        throw $e;
    }

    // 获取并清空缓存
    $content = ob_get_clean();
    // 内容过滤标签
    Hook::listen('view_filter', $content);
    return $content;
}先开启缓冲区,然后定义变量用来存放用户自定义的需要替换的字符串,进入config()函数中做渲染引擎初始化配置
public function config($name, $value = null)
{
    if (is_array($name)) {
        $this->template->config($name);
        $this->config = array_merge($this->config, $name);
    } elseif (is_null($value)) {
        return $this->template->config($name);
    } else {
        $this->template->$name = $value;
        $this->config[$name]   = $value;
    }
}然后进入$this->engine->$method($template, $vars, $config);
public function fetch($template, $data = [], $config = [])
{
    if ('' == pathinfo($template, PATHINFO_EXTENSION)) {
        // 获取模板文件名
        $template = $this->parseTemplate($template);
    }
    // 模板不存在 抛出异常
    if (!is_file($template)) {
        throw new TemplateNotFoundException('template not exists:' . $template, $template);
    }
    // 记录视图信息
    App::$debug && Log::record('[ VIEW ] ' . $template . ' [ ' . var_export(array_keys($data), true) . ' ]', 'info');
    $this->template->fetch($template, $data, $config);
}当没有传模板名时会使用$this->parseTemplate($template)来自动搜索模板文件
private function parseTemplate($template)
{
    ...
        if ($this->config['view_base']) {
            // 基础视图目录
            $module = isset($module) ? $module : $request->module();
            $path   = $this->config['view_base'] . ($module ? $module . DS : '');
        } else {
            $path = isset($module) ? APP_PATH . $module . DS . 'view' . DS : $this->config['view_path'];
        }

    $depr = $this->config['view_depr'];
    if (0 !== strpos($template, '/')) {
        $template   = str_replace(['/', ':'], $depr, $template);
        $controller = Loader::parseName($request->controller());
        if ($controller) {
            if ('' == $template) {
                // 如果模板文件名为空 按照默认规则定位
                $template = str_replace('.', DS, $controller) . $depr . (1 == $this->config['auto_rule'] ? Loader::parseName($request->action(true)) : $request->action());
            }
            ...
        }
    }
    ...
        return $path . ltrim($template, '/') . '.' . ltrim($this->config['view_suffix'], '.');
}最后返回的就是E:\code\php\thinkphp\thinkphp5\public/../application/index\view\index\index.html,这是默认的模板位置,然后debug之后又进入$this->template->fetch($template, $data, $config)
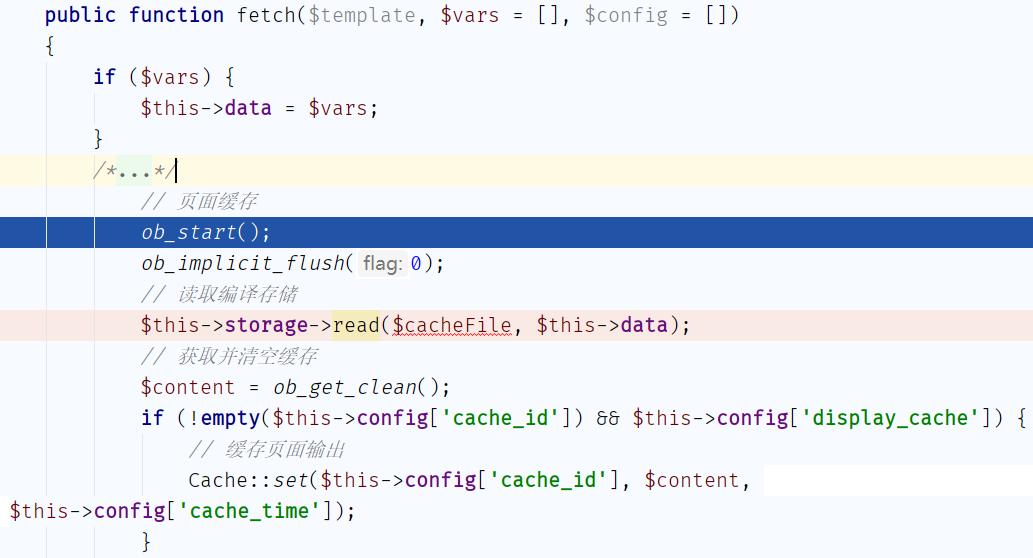
$this->data = $vars;将参数合并到data中,然后开启缓冲区,进入$this->storage->read($cacheFile, $this->data),然后输出$content,最后$content就是我们模板已经被解析过的内容。那么我们进入$this->storage->read()看下
public function read($cacheFile, $vars = [])
{
    $this->cacheFile = $cacheFile;
    if (!empty($vars) && is_array($vars)) {
        // 模板阵列变量分解成为独立变量
        extract($vars, EXTR_OVERWRITE);
    }
    //载入模版缓存文件
    include $this->cacheFile;
}会将我们的参数进行变量覆盖,然后包含缓存文件,也就是我们的模板文件,在包含的时候缓冲区就写入了渲染完成的模板的内容,而后$content获取到的就是渲染的内容,这就是全部流程。
8.1 小结
9 总结
thinkphp那么多的代码不是我一篇文章就能说完的,阅读thinkphp的源码你需要对thinkphp的开发流程及php的函数特性有着足够深入的了解,在本文中只是简单介绍了thinkphp的实现过程,有很多东西没有时间和精力去写笔记,比如模板解析、Model层、数据库交互、模板缓存等是怎么实现的,东西是写给自己看的,如果有前辈或者后人看到了这篇文章,请多谅解。
文笔垃圾,措辞轻浮,内容浅显,操作生疏。不足之处欢迎大师傅们指点和纠正,感激不尽。